Difference between revisions of "Manage Groups"
Tom Maurice (talk | contribs) |
Tom Maurice (talk | contribs) |
||
| Line 47: | Line 47: | ||
===Setup=== | ===Setup=== | ||
====Summary==== | ====Summary==== | ||
| − | This page gives you the overall aspects of the selected group. You can see the groups description along with which categories and sub-categories it is assigned to and the groups logo. You can also see what requirements were enabled/disabled in the setup of this groups. For example, if this group requires next of kin details to provided by anyone purchasing a membership to this group. At the bottom of the page you can also see any awards that the group has achieved, to learn more about setting up group awards [Manage_Awards|click here]. | + | This page gives you the overall aspects of the selected group. You can see the groups description along with which categories and sub-categories it is assigned to and the groups logo. You can also see what requirements were enabled/disabled in the setup of this groups. For example, if this group requires next of kin details to provided by anyone purchasing a membership to this group. At the bottom of the page you can also see any awards that the group has achieved, to learn more about setting up group awards [[Manage_Awards|click here]]. |
====Edit==== | ====Edit==== | ||
====Group Logo==== | ====Group Logo==== | ||
Revision as of 09:52, 28 July 2016
Groups is the place to create, control and administrate all of the clubs, societies and any other groups you may have on your site.
Contents
Manage Groups
This is the management console for all the groups on your site. As an administrator of this section you can easily keep an eye on the groups that are on your site and monitor new group or group membership requests.
List Groups
This provides you with a comprehensive list of all the groups on your site. Use the view ![]() button to enter a group admin pages or use the edit
button to enter a group admin pages or use the edit ![]() button to edit the groups overall settings. You can also fitler
button to edit the groups overall settings. You can also fitler ![]() this page and search by Name, Group Type or State.
this page and search by Name, Group Type or State.
To create a new group select a group type from the dropdown menu at the bottom of the page and this will take you through to the Create Group page.
Create New Group
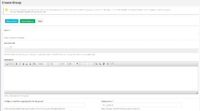
![]() Note: This section is where you can setup the basic settings for a new group on your site. Once you have completed this page you can then edit other aspects, such as memberships, committee and events, in the management page for your group.
Note: This section is where you can setup the basic settings for a new group on your site. Once you have completed this page you can then edit other aspects, such as memberships, committee and events, in the management page for your group.
- Name - Give the group a suitable name.
- Nominal Code - Nominal codes are used for group finances. If applicable, select a code from the list. To setup new codes use the setup menu.
- Description - Enter a description for this group.
- Configure email for outgoing mails for this group - Enter an email address that communications from this group will be delivered from.
- Display name - Enter a display name for this group communications.
- Assign Category/Sub Category - Help users searching for groups on your site easily find this group by adding it to a sub category.
- Group Tags - Enter keywords to help users find this group. Separate each keyword or phrase with a comma.
- Next of king required - Enable this to require next of kin details for memberships.
- Over eighteen - Enable this if users must be over 18 to join.
- Member approval required - Enable this to require new members to be approve before joining.
- CMS content defaults to draft - Enable this to make new content such as pages default to draft.
- Articles defaults to draft - Enable this to make articles default to draft.
- Check this to create bespoke subsite - Enable this to create a subsite for this group.
- Max subscription years - How many years can a user join this group for?
- Group membership expiry date - Set a global expiry date for all memberships within this group. Setting a date will update existing memberships.
- Group terms and conditions - Enable this to add custom terms and conditions for this group.
New
Any groups that have been newly created on your site will appear here.
Pending
If a group has been created by someone who does not have permissions to automatically approve a group it will sit in this section. The group will not be live on your site until an admin has approved a pending group. To do this check the Approve box and the group will move into the 'Approved' section and appear in on the groups page of your site. <your site>/groups
Approved
Any groups that are approved on your site will appear below. You can filter![]() this page or you can edit/manage
this page or you can edit/manage ![]() a group by clicking the cog icon.
a group by clicking the cog icon.
All groups that are in the section are live on your site. <your site>/groups
Blocked
Membership Approval
If you have configured your site so that the creation of a new membership type requires an administrators approval it will sit in the section. The membership will not go live on the front end of your site unless an admin approves. You can also reject membership types if you feel it is not suitable.
Group Management
When in the manage groups section, if you click the view ![]() icon next to a group this will take you into the groups setup pages.
icon next to a group this will take you into the groups setup pages.
Setup
Summary
This page gives you the overall aspects of the selected group. You can see the groups description along with which categories and sub-categories it is assigned to and the groups logo. You can also see what requirements were enabled/disabled in the setup of this groups. For example, if this group requires next of kin details to provided by anyone purchasing a membership to this group. At the bottom of the page you can also see any awards that the group has achieved, to learn more about setting up group awards click here.
Edit
Group Logo
Membership Types
Questions
Awards
Social Media
User Groups
List User Groups
Add User Group
Events
List Events
Add Event
Event Promotions
Content Management
Here you can setup a subsite for your group. If there is already a well built subsite on your site you can copy it and use it's structure rather than start from scratch. To do this, sign in as an admin and go to the ‘Content Management’ section of a group that currently does not have a subsite. Click the ‘Show [+]’ link next to ‘Copy Structure From Subsites’ heading. Using the dropdown menu, select the Subsite that you wish to copy and then click 'Copy CMS'. UnionCloud will then ask you to confirm you want to copy the selected Subsite. Once accepted UnionCloud will copy that subsite to the group’s page. Similarly to copying items in the Pages (Tree View) in the Developers Toolkit, UnionCloud will copy the subsite and past it in draft form.
The rest of this section works in the same way as the Developers Toolkit. For more information please visit those pages.

