Difference between revisions of "Manage Group Promotions"
(→New Promotion) |
|||
| Line 1: | Line 1: | ||
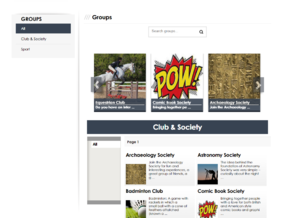
| − | [[File: | + | [[File:Group Promotion.png|thumb|right|What group promotions looks like.]] |
{{url|/groups/}} | {{url|/groups/}} | ||
If you have active promotions and you navigate to the Groups page on the front end of your website, you will notice that above the groups search tool, there is a small area, that small images with links can be placed on, this is a 'Group Promotion' and should be used to periodically advertise some student groups, you can place a number of them in there at any one time, the images must be square so as to retain their aspect ratio, and we recommend a size of <code>296px x 296px</code> or larger. | If you have active promotions and you navigate to the Groups page on the front end of your website, you will notice that above the groups search tool, there is a small area, that small images with links can be placed on, this is a 'Group Promotion' and should be used to periodically advertise some student groups, you can place a number of them in there at any one time, the images must be square so as to retain their aspect ratio, and we recommend a size of <code>296px x 296px</code> or larger. | ||
Revision as of 15:29, 24 April 2018
You can find this page on your own site at url: <yoursite>/groups/
If you have active promotions and you navigate to the Groups page on the front end of your website, you will notice that above the groups search tool, there is a small area, that small images with links can be placed on, this is a 'Group Promotion' and should be used to periodically advertise some student groups, you can place a number of them in there at any one time, the images must be square so as to retain their aspect ratio, and we recommend a size of 296px x 296px or larger.
By clicking on the box it will take the user directly to the page for the group whom the promotion is set for.
Manage Promotions
You can find this page on your own site at url: <yoursite>/administrator/group_promotions
Adding and managing promotions is easy, its the second option below the Groups menu on the Dashboard, or you can go directly there by navigating to the URL above.
As with most sections of the Dashboard, this page presents you with a table of current and past Group Promotions, listed by; Name, Start Date, End Date, Status. These can all be used to Filter the table if you have a large number of entries and you're looking for a specific one, just click on the button ![]() in the top right of the table.
in the top right of the table.
Below that for each Promotion there are four more buttons; View![]() , Edit
, Edit![]() , Delete
, Delete![]() , and State, which appears in Red with a stop button, or green with a play button depending on a campaigns current state.
Most of the buttons do exactly what they say on the tin.
, and State, which appears in Red with a stop button, or green with a play button depending on a campaigns current state.
Most of the buttons do exactly what they say on the tin.
- View
 Gives you an overview of a particular promotion, the dates, the details, and shows you the image used to advertise it
 - Edit
 Similar to above however it also gives you the opportunity to amend any details, who it's for, when it runs, what image is used.
 - Delete
 Presents a pop up asking if you are sure you want to delete a Promotion.
 - State - Depending on it's current state appears as a Red Circle with a stop symbol in, which can temporarily suspend a promotion if you wish, or a Green circle with a Play symbol in, which can be used to activate one.
Finally, at the bottom, of the Manage Promotions screen there is an 'Add Group Promotion' button, which takes you to the screen described below.
New Promotion
You can find this page on your own site at url: <yoursite>/administrator/group_promotions/new
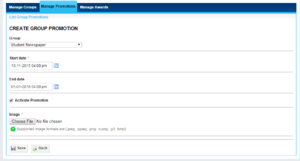
Adding a new promotion is simple, after clicking 'Add Group Promotion' from the Manage promotions screen, you are presented with some options
- Group -
[Dropdown]Lookup box for selecting a group - Start Date - Date/Time Box for setting date advertisement will start
- End Date - (Optional) For setting the date you wish the advertisement to end.
- Activate Promotion
[Checkbox]- Does the same as the Red/Green Stop Start buttons mentioned above. - Image - 'Choose File'System Dialogue to select the image you want to use for the Promotion.


