Difference between revisions of "Campaign Manager"
(→Previous Campaigns) |
Tom Maurice (talk | contribs) |
||
| Line 11: | Line 11: | ||
This screen will list all campaigns that have been designed by a union, and completed, but not sent out, some unions will plan campaigns months in advance, or for the whole year ahead for example, and just leave them here, ready to be sent at particular dates / times, others will use this section to store templates for fortnightly emails. | This screen will list all campaigns that have been designed by a union, and completed, but not sent out, some unions will plan campaigns months in advance, or for the whole year ahead for example, and just leave them here, ready to be sent at particular dates / times, others will use this section to store templates for fortnightly emails. | ||
| − | == | + | ===Create Campaign=== |
{{url|<nowiki>/administrator/union_campaigns/new?status=union</nowiki>}} | {{url|<nowiki>/administrator/union_campaigns/new?status=union</nowiki>}} | ||
[[File:CampaignManager New.PNG|thumb|desc]] | [[File:CampaignManager New.PNG|thumb|desc]] | ||
| Line 20: | Line 20: | ||
*Campaign Type - Select Commercial / Communication, depending on whether you are emailing Opt Ins (Commercial), or emailing ALL Students (Communication) | *Campaign Type - Select Commercial / Communication, depending on whether you are emailing Opt Ins (Commercial), or emailing ALL Students (Communication) | ||
| − | ===Include / Exclude Criteria=== | + | ====Include / Exclude Criteria==== |
The next section, is used for targeting specific groups of students, and is split into two sections, Include, and Exclude, both contain the same filters; | The next section, is used for targeting specific groups of students, and is split into two sections, Include, and Exclude, both contain the same filters; | ||
In each case you have to tick the checkbox if you intend to use the filter; | In each case you have to tick the checkbox if you intend to use the filter; | ||
| Line 27: | Line 27: | ||
After you have set your include / exclude criteria, click on the orange '''Show Target Audience''' button, which will give me a summary of the target audience you have set, and also the number of users it will be sent to. | After you have set your include / exclude criteria, click on the orange '''Show Target Audience''' button, which will give me a summary of the target audience you have set, and also the number of users it will be sent to. | ||
| − | ===Header / Footer=== | + | ====Header / Footer==== |
If you continue down the page, you will see a 'From' box; | If you continue down the page, you will see a 'From' box; | ||
*From - this box is a drop down that will list any email addresses, that you have enabled to send emails within the [[Setup]] - Emails section. This is useful if you want to send out different emails from different departments at other points in time | *From - this box is a drop down that will list any email addresses, that you have enabled to send emails within the [[Setup]] - Emails section. This is useful if you want to send out different emails from different departments at other points in time | ||
| Line 36: | Line 36: | ||
The above two options set whether you need to include any Header / Footer content in the Campaign you are sending out, or if you just wish to user you Unions standard content, for example if you were sending out a commercial 3rd party email, you may not want it to include your header and footer, you can update your Header and Footer in the [[Setup]] - CMS section. | The above two options set whether you need to include any Header / Footer content in the Campaign you are sending out, or if you just wish to user you Unions standard content, for example if you were sending out a commercial 3rd party email, you may not want it to include your header and footer, you can update your Header and Footer in the [[Setup]] - CMS section. | ||
| − | ===Email Content=== | + | ====Email Content==== |
Finally you can complete your email content, you can do this either by using the CK Editor, or switching to source and pasting in any HTML that you've written, or received to be included in a mail out. | Finally you can complete your email content, you can do this either by using the CK Editor, or switching to source and pasting in any HTML that you've written, or received to be included in a mail out. | ||
Revision as of 15:59, 12 July 2016
You can find this page on your own site at url: <yoursite>/administrator/union_campaigns?status=union
Campaign Manager, this is our answer to a Bulk Email Sender / Email Manager, Solus Marketing Email tool, Mail Chimp, whatever you feel like calling it.
If you want to send your emails out to your members, this is the way to go about it, you can use this tool to send emails to everyone, just marketing opt-ins, or even very specific groups of students, by creating Dynamic User Groups, which you can find info on doing in the User Groups & Permissions section!
Contents
Draft / Pending Campaigns
This screen will list all campaigns that have been designed by a union, and completed, but not sent out, some unions will plan campaigns months in advance, or for the whole year ahead for example, and just leave them here, ready to be sent at particular dates / times, others will use this section to store templates for fortnightly emails.
Create Campaign
You can find this page on your own site at url: <yoursite>/administrator/union_campaigns/new?status=union
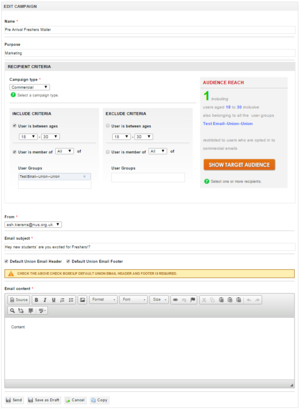
Base Questions
This section, presents you with a number of boxes to complete
- Name - This must be unique to any campaign you run, some unions like to include relevant keywords like Freshers / Elections / Name of an Event / A Year / Month
- Purpose - This field doesn't have to be unique and many unions use it to help filter, they categorise campaigns by Marketing / Comms / Sabb Update / Nominations etc.
- Campaign Type - Select Commercial / Communication, depending on whether you are emailing Opt Ins (Commercial), or emailing ALL Students (Communication)
Include / Exclude Criteria
The next section, is used for targeting specific groups of students, and is split into two sections, Include, and Exclude, both contain the same filters; In each case you have to tick the checkbox if you intend to use the filter;
- User is between ages [Age1] [Age2] - Fairly straight forward way to set age range based emails.
After this check box, you have the option of choosing [Any] or [All] if you want to add multiple user groups to the filter, you can use this to add any of the default groups, such as Admin, Confirmed Students, Activated Students, Non-Students, Groups Created from Registration Questions, or you can add any Custom User Groups that you've created, this is particularly useful if you want to target a very specific group of students, by creating a Custom Group, using the Dynamic User Group filters!
After you have set your include / exclude criteria, click on the orange Show Target Audience button, which will give me a summary of the target audience you have set, and also the number of users it will be sent to.
If you continue down the page, you will see a 'From' box;
- From - this box is a drop down that will list any email addresses, that you have enabled to send emails within the Setup - Emails section. This is useful if you want to send out different emails from different departments at other points in time
- [Checkbox] Default Union Email Header
- [Checkbox] Default Union Email Footer
The above two options set whether you need to include any Header / Footer content in the Campaign you are sending out, or if you just wish to user you Unions standard content, for example if you were sending out a commercial 3rd party email, you may not want it to include your header and footer, you can update your Header and Footer in the Setup - CMS section.
Email Content
Finally you can complete your email content, you can do this either by using the CK Editor, or switching to source and pasting in any HTML that you've written, or received to be included in a mail out. A few things to bear in mind
- Think about the sizes of your images, some users will be viewing on mobile devices
- Compatibility, think about your use of Styles, not all HTML / CSS are compatible with Outlook for example.
- Scalability, Responsiveness - look for a template that will re-size based on Screen size!
Previous Campaigns
You can find this page on your own site at url: <yoursite>/administrator/union_campaigns?status=unionpast
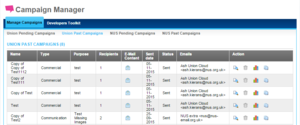
On this screen you can see all previous campaigns run by the Union, under the Campaign Manager tool, it displays fairly basic information on the surface though this can be expanded upon, it shows you; The Name of the Campaign, The Type of Campaign, the Purpose, The Number of Recipients, link (appearing as an open envelope) to view the content, the date sent, it's status, the address it was sent from, and some options to View ![]() , Delete
, Delete![]() , Show StatisticsTemplate:Stats, or Copy
, Show StatisticsTemplate:Stats, or Copy![]() .
.
Statistics
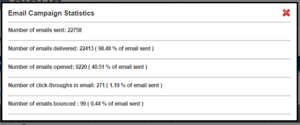
The Show statistics option brings up a small overlay giving yo the followig information
- Number of emails sent:
- Number of emails delivered: (and %)
- Number of emails opened: (and %)
- Number of click-throughs in email (and %)
- Number of emails bounced (and %)
NUS
The two sections below are for you to view, and veto any campaigns NUS intends to use.
NUS Pending Campaigns
This screen shows you any campaigns that NUS has planned to be sent out in the coming few weeks, with an option to Veto the campaign, if the union in question has any particular disagreements with the content of the campaign.
NUS Past Campaigns
As with Union past campaigns, this screen gives a summary of all previous campaigns, including access to the statistics, as has been broken down above.


