Difference between revisions of "Manage Course Rep"
| (5 intermediate revisions by the same user not shown) | |||
| Line 8: | Line 8: | ||
[[File:Manage Course Reps 3.PNG|thumb|Table showing current reps for selected course]] | [[File:Manage Course Reps 3.PNG|thumb|Table showing current reps for selected course]] | ||
'''Course Reps Table'''<br/> | '''Course Reps Table'''<br/> | ||
| − | Once the page has refreshed the table will populate, providing that there are reps already setup for the course you have chosen, and the table will look similar to the screenshot seen to the right, it displays all of the reps for a course in question, and shows Name, Position, Email, Contact No, and the filter icon{{filter}, allowing, which allows filtering by Position, Email, or Contact No. | + | Once the page has refreshed the table will populate, providing that there are reps already setup for the course you have chosen, and the table will look similar to the screenshot seen to the right, it displays all of the reps for a course in question, and shows Name, Position, Email, Contact No, and the filter icon{{filter}}, allowing, which allows filtering by Position, Email, or Contact No. |
<br/> | <br/> | ||
In the far right hand column, there are also options to View{{View}}, Edit{{Edit}}, and Delete{{Delete}} a specific Course Representative. | In the far right hand column, there are also options to View{{View}}, Edit{{Edit}}, and Delete{{Delete}} a specific Course Representative. | ||
<br/> | <br/> | ||
| + | |||
==Adding a New Course Rep== | ==Adding a New Course Rep== | ||
[[File:Manage Course Reps 4.PNG|thumb|Adding New Course Rep screen]] | [[File:Manage Course Reps 4.PNG|thumb|Adding New Course Rep screen]] | ||
| − | The Add new Course Rep tool, is very | + | The Add new Course Rep tool, is very straightforward to use, as with the process above to display all current Course Reps for a current course, you need to use one of the drop down boxes to select a course, either by <code>program_id</code>, or by <code>program_name</code> once you have selected an option from one of the two lists to look up the course, the page will refresh, and the table below will return to you any valid program reps for the course you have just selected, or if none, remain blank.<br/> |
| + | |||
| + | Now you are able to click the add button at the top of the page, this will bring up the page to the right, which has the following fields for your to fill in: | ||
| + | |||
| + | *'''Programme ID''' - This should be automatically completed. | ||
| + | |||
| + | *'''Programme Name''' - This should be automatically completed. | ||
| + | |||
| + | *'''Course User Group Name''' - This should be automatically completed. | ||
| + | |||
| + | *'''Representative Name''' - Start typing into the box the name of the person you want to assign to this position and they should appear in the drop-down. | ||
| + | |||
| + | *'''Position''' - Here you would enter a relevant name for this position, such as 1st Year Rep for MSc Biology. | ||
| + | |||
| + | *'''Start Date''' - Use the date picker to select the date when this user will become a course rep. | ||
| + | |||
| + | *'''End Date''' - Use the date picker to select the date when this user's time as a course rep will end. | ||
| + | |||
| + | *'''Email''' - This field will be automatically populated when you select assign a user in the Representative Name field. | ||
| − | + | *'''Contact No''' - Use this field to enter a contact number for this course rep, so that students can get in touch by phone. | |
==Course Rep Lookup Tool== | ==Course Rep Lookup Tool== | ||
Latest revision as of 15:13, 27 July 2018
You can find this page on your own site at url: <yoursite>/administrator/programs/course_rep
View Course Reps
Course Rep Lookup Tool
The Course Rep lookup tool is easy to use, depending on the information available to you, you can lookup the program rep for a specific course, by either their program_id, or by program_name, these appear on the page as two dropdown boxes, and should be in alphabetical order, you need only use one of the options, but once you choose one and scroll down the list to the specific id or name and select it, the page will refresh and the table showing program reps for that course will be populated.
Course Reps Table
Once the page has refreshed the table will populate, providing that there are reps already setup for the course you have chosen, and the table will look similar to the screenshot seen to the right, it displays all of the reps for a course in question, and shows Name, Position, Email, Contact No, and the filter icon![]() , allowing, which allows filtering by Position, Email, or Contact No.
, allowing, which allows filtering by Position, Email, or Contact No.
In the far right hand column, there are also options to View![]() , Edit
, Edit![]() , and Delete
, and Delete![]() a specific Course Representative.
a specific Course Representative.
Adding a New Course Rep
The Add new Course Rep tool, is very straightforward to use, as with the process above to display all current Course Reps for a current course, you need to use one of the drop down boxes to select a course, either by program_id, or by program_name once you have selected an option from one of the two lists to look up the course, the page will refresh, and the table below will return to you any valid program reps for the course you have just selected, or if none, remain blank.
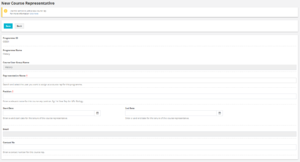
Now you are able to click the add button at the top of the page, this will bring up the page to the right, which has the following fields for your to fill in:
- Programme ID - This should be automatically completed.
- Programme Name - This should be automatically completed.
- Course User Group Name - This should be automatically completed.
- Representative Name - Start typing into the box the name of the person you want to assign to this position and they should appear in the drop-down.
- Position - Here you would enter a relevant name for this position, such as 1st Year Rep for MSc Biology.
- Start Date - Use the date picker to select the date when this user will become a course rep.
- End Date - Use the date picker to select the date when this user's time as a course rep will end.
- Email - This field will be automatically populated when you select assign a user in the Representative Name field.
- Contact No - Use this field to enter a contact number for this course rep, so that students can get in touch by phone.
Course Rep Lookup Tool
You can find this page on your own site at url: <yoursite>course_rep
So long as the following three criteria have been met;
- You have a
course_idassigned to you. - Your institution programme file, has been completed, and contains your
course_id - Following the process above, or by CSV Upload, a Course Rep has been assigned to your
course_id
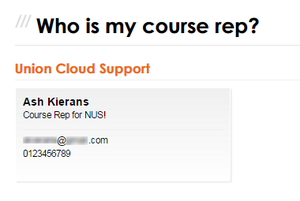
As a student, if you navigate to the URL above on a UnionCloud site, then a system page is generated which will show you any student that is listed as a programme representetive for your course. It has the ability to display more than one, and as you saw in the 'Adding a New Course Rep' screen above, the title is Open Text, which means you can set the label as you wish, so you could have One School President who shows for everyone on any number of courses within a school, and then also have a handful of course reps show up for one course.


