Difference between revisions of "CMS"
| (One intermediate revision by the same user not shown) | |||
| Line 21: | Line 21: | ||
==Article Categories== | ==Article Categories== | ||
[[File:Article Categories.png|thumb|right|Article Categories Screen]] | [[File:Article Categories.png|thumb|right|Article Categories Screen]] | ||
| − | |||
| Line 28: | Line 27: | ||
==Resource Categories== | ==Resource Categories== | ||
| + | [[File:Resource Categories.png|thumb|right|Resource Categories Screen]] | ||
| + | |||
| + | Clicking on the last tab within CMS configuration will present you with a list of all resource categories on your site. Essentially, all your resource types, so that they can be categorised and more easily found by users. This page is pretty much exactly the same as the Article Categories page and you can add resource categories exactly the same way. | ||
| + | From this page clicking on the {{cog}} next to a category will allow you the options to view {{view}}, edit {{edit}} or delete {{delete}} the category. To add a new Category, click on the blue '''Add Resource Category''' button at the top of the page. You will then be asked to give your new category a name and create any sub-categories within it. | ||
Latest revision as of 10:36, 26 July 2018
CMS is a stub, and just part of a wider section on UnionCloud Setup, for the full UnionCloud setup index please check the page here.
An administrator can use this section to configure various settings related to CMS (Content Management System), which also includes configuring categories for articles and resources/documents which you will upload onto your site.
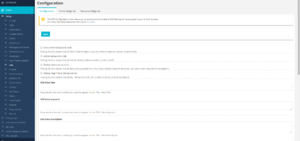
Configuration
In this first tab of CMS configuration, you can set-up several options which will apply across your site. The first four options are tickboxes which can be used to enable/disable how various content is displayed.
- CMS content defaults to draft - Ticking this box means that All CMS Content (Pages, Links etc.) will be defaulted to draft at creation, and not automatically made live on your site.
- Articles defaults to draft - Ticking this box means that All Articles will be defaulted to draft at creation, and not automatically made live on your site.
- Display resources as public - Ticking this box means that All Resources uploaded into UnionCloud will be Public, and users aren't required to be logged in to view them.
- Display Page Title in the top section - Ticking this box means that all the Title boxes from All CMS Content is set to be show by default.
The next section displays several textboxes which can be utilised for Search Engine Optimisation:
- SEO Meta Title - Populate this box with content you want to appear in the HTML Meta Title.
- SEO Meta Keyword - Populate this box with content you want to appear in the HTML Meta Keyword.
- SEO Meta Description - Populate this box with content you want to appear in the HTML Meta Description.
- Metadata For Third Party - Populate this box with any other content you want to appear in the HTML Meta.
The last section of the configuration page is Email Footer, which you can use to customise the Default Email footer that can be included on all Campaigns sent through UnionCloud.
Article Categories
Clicking on the second tab within CMS configuration will present you with a list of all article categories on your site. Essentially, all your articles types, so that they can be categorised and more easily found by users.
From this page clicking on the ![]() next to a category will allow you the options to view
next to a category will allow you the options to view ![]() , edit
, edit ![]() or delete
or delete ![]() the category. To add a new Category, click on the blue Add Article Category button at the top of the page. You will then be asked to give your new category a name and create any sub-categories within it. For example, a category could be Sport with sub-categories of Rugby and Tennis.
the category. To add a new Category, click on the blue Add Article Category button at the top of the page. You will then be asked to give your new category a name and create any sub-categories within it. For example, a category could be Sport with sub-categories of Rugby and Tennis.
Resource Categories
Clicking on the last tab within CMS configuration will present you with a list of all resource categories on your site. Essentially, all your resource types, so that they can be categorised and more easily found by users. This page is pretty much exactly the same as the Article Categories page and you can add resource categories exactly the same way.
From this page clicking on the ![]() next to a category will allow you the options to view
next to a category will allow you the options to view ![]() , edit
, edit ![]() or delete
or delete ![]() the category. To add a new Category, click on the blue Add Resource Category button at the top of the page. You will then be asked to give your new category a name and create any sub-categories within it.
the category. To add a new Category, click on the blue Add Resource Category button at the top of the page. You will then be asked to give your new category a name and create any sub-categories within it.


