Difference between revisions of "Registration"
| (6 intermediate revisions by the same user not shown) | |||
| Line 1: | Line 1: | ||
| − | {{PAGENAME}} is a stub, and just part of a wider section on UnionCloud Setup, for the full UnionCloud setup index please check the page [[Setup|here]]. | + | {{PAGENAME}} is a stub, and just part of a wider section on UnionCloud Setup, for the full UnionCloud setup index please check the page [[Setup|here]]. |
| + | |||
| + | '''Please remember to click the save button if you make any changes to the Registration page, otherwise, your changes will not be kept and applied to your site!!''' | ||
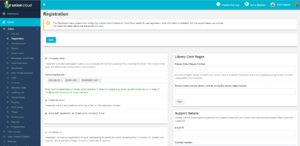
[[File:Setup - Registration.PNG|thumb|Setup Registration Screen]] | [[File:Setup - Registration.PNG|thumb|Setup Registration Screen]] | ||
| + | <br/> | ||
| + | <br/> | ||
==Accepted Emails== | ==Accepted Emails== | ||
| Line 36: | Line 40: | ||
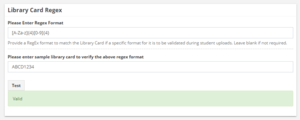
You can use this section to format library card IDs, if you require this at your institution. This section is all about making sure that the system recognises library card IDs and that they are in the correct format. This process is exactly the same as setting up your Regex Format for university IDs, see details above. All you need to do is enter your standard library card ID Regex format into the first field and then a sample library card ID into the second field to test its validity. If you do not have library cards, or do not require this capability, simply leave this section blank. | You can use this section to format library card IDs, if you require this at your institution. This section is all about making sure that the system recognises library card IDs and that they are in the correct format. This process is exactly the same as setting up your Regex Format for university IDs, see details above. All you need to do is enter your standard library card ID Regex format into the first field and then a sample library card ID into the second field to test its validity. If you do not have library cards, or do not require this capability, simply leave this section blank. | ||
| + | <br/> | ||
| + | <br/> | ||
==Support Details== | ==Support Details== | ||
| + | [[File:Registration - Support Details.png|thumb|right|Registration - Support Details]] | ||
| + | Last, but certainly not least, you can set-up support contact details. So, if users are struggling with something or have any issues, they know who to contact. Simply enter an email and telephone number and you are good to go. | ||
Latest revision as of 11:03, 15 August 2018
Registration is a stub, and just part of a wider section on UnionCloud Setup, for the full UnionCloud setup index please check the page here.
Please remember to click the save button if you make any changes to the Registration page, otherwise, your changes will not be kept and applied to your site!!
Contents
Accepted Emails
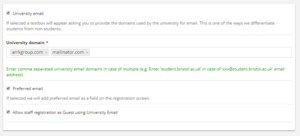
The first section of registration is where you would set-up accepted emails. Ticking the box next to University email will produce a textbox where you can enter your university domain, for example student.bristol.ac.uk. The system will cross-reference this domain with users on your site to distinguish between students and non-students. Anybody who registers with an email address whose domain matches that which is entered here, will be automatically defined as a student on your site.
The second tickbox allows you to add a preferred email field on the registration screen when users register. This allows users to enter another email address when they register, that is different to their institutional one, which is useful for students who may want to use a personal email address.
The last option on this section is to Allow staff registration as Guest using University Email. Staff members will inevitably have the same email address domain as their students. Ticking this box allows staff to use their institution email address to register as a guest rather than be defined as a student, essentially bypassing the first option of automatically adding users with the university domain to a student usergroup.
University ID Setup
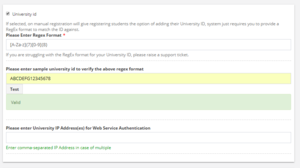
The second section of the registration section is where you set-up university IDs. This section is all about making sure that the system recognises university IDs and that they are in the correct format. Checking the tickbox next to University ID will produce a textbox asking you to Please Enter Regex Format, which will be the general format for your university IDs. For example, [A-Za-z]{7}[0-9]{8}, means that your university IDs consist of 7 letters and 8 numbers, such as ABCDEFG12345678. If you are struggling with your Regex Format, raise a support ticket on Zendesk. The next field is where you can verify your Regex Format to make sure it is correct. All you need to do is enter a sample university ID and click test - the system will let you know if it valid or invalid.
The last field in this section is for adding any IP Addresses for Web Service Authentication. This is essentially IP whitelisting, allowing you to create a list of trusted IP addresses or IP ranges from which your users can access your domain, for example, the IP address of your institution or university. You can enter multiple IP addresses, just remember to put commas in between each one to separate them.
Registration and Access
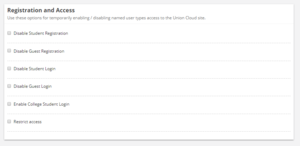
This section consists of a variety of checkboxes which allow you to temporarily enable or disable particular types of users' access to your site, which could be used for a variety of reasons. Ticking any of the first four options will not allow these users to register or login to your site:
- Disable Student Registration
- Disable Guest Registration
- Disable Student Login
- Disable Guest Login
Ticking the next option will create a separate login option when users try to register/login on the site. This is particularly useful for institutions/universities who also run courses for college students as well as higher education students.
- Enable College Student Login
Ticking the last option restricts access completely, meaning that anyone who wants to view your site must first login. Essentially your site will not be available for public access.
- Restrict access
Library Card Regex
You can use this section to format library card IDs, if you require this at your institution. This section is all about making sure that the system recognises library card IDs and that they are in the correct format. This process is exactly the same as setting up your Regex Format for university IDs, see details above. All you need to do is enter your standard library card ID Regex format into the first field and then a sample library card ID into the second field to test its validity. If you do not have library cards, or do not require this capability, simply leave this section blank.
Support Details
Last, but certainly not least, you can set-up support contact details. So, if users are struggling with something or have any issues, they know who to contact. Simply enter an email and telephone number and you are good to go.
