Difference between revisions of "Articles Manager"
(→Widget Options) |
|||
| (4 intermediate revisions by the same user not shown) | |||
| Line 1: | Line 1: | ||
| − | + | The Articles section is the News / Articles / Blog / similar, section of the UnionCloud website. It is the simplest form of content on UnionCloud. This module has been developed to make it easy to create, edit and manage your articles, so that your news stories can be displayed to the users in an attractive manner. | |
| − | The Articles section is the News / Articles / Blog / similar, section of the | ||
== Manage Articles == | == Manage Articles == | ||
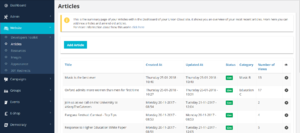
[[File:Articles_Manage.PNG|thumb|The Manage Articles View]] | [[File:Articles_Manage.PNG|thumb|The Manage Articles View]] | ||
| − | This is the summary page of your Articles within the Dashboard of your | + | This is the summary page of your Articles within the Dashboard of your UnionCloud site, it shows you an overview of you're most recent articles (20) as the it is paginated, though if you want to show all there is a button to do that at the bottom.<br/> |
As with most of the sections of the Dashboard, this view is set out in a very easy to read, and easy to understand manner.<br/> The table shows you the Name, Date Created, Date Updated, Status, Category, and Number of views for each of your News Articles, you can also use the Filter{{Filter}} button in the top right to search for articles by Name, Category or Date Range. Clicking the '''Add''' Button at the bottom of the page, or the Edit{{Edit}} button, will take you to the Adding / Editing Articles screen, as outlined below, The Delete{{Delete}} button, presents a pop up, asking if you are sure you want to delete the article, if you accept the article will be removed from your website (if you want a less permenant solution, you can move an article to drafts, again explained below), then small clock like button, shows when the article will be visible from, and until if you have chosen to set that. | As with most of the sections of the Dashboard, this view is set out in a very easy to read, and easy to understand manner.<br/> The table shows you the Name, Date Created, Date Updated, Status, Category, and Number of views for each of your News Articles, you can also use the Filter{{Filter}} button in the top right to search for articles by Name, Category or Date Range. Clicking the '''Add''' Button at the bottom of the page, or the Edit{{Edit}} button, will take you to the Adding / Editing Articles screen, as outlined below, The Delete{{Delete}} button, presents a pop up, asking if you are sure you want to delete the article, if you accept the article will be removed from your website (if you want a less permenant solution, you can move an article to drafts, again explained below), then small clock like button, shows when the article will be visible from, and until if you have chosen to set that. | ||
| Line 46: | Line 45: | ||
On the front end of the website, there will be a small settings cog on the left-hand side if you click this it will bring up some options that will allow you to turn on ‘'''Edit Mode'''’ this then allows you to implement elements you want to appear on your website. | On the front end of the website, there will be a small settings cog on the left-hand side if you click this it will bring up some options that will allow you to turn on ‘'''Edit Mode'''’ this then allows you to implement elements you want to appear on your website. | ||
| − | The blue bar which is a '''tab container''' you will see a plus sign which appears in the middle. Once you click the plus sign you will be able to see different icons these icons have different functionalities which can be applied to the page, however, in this case the widget icon is relevant in terms of publishing articles or resources which would populate the website and makes it a lot more user friendly. | + | The blue bar which is a '''tab container''' you will see a plus sign which appears in the middle. Once you click the plus sign you will be able to see different icons these icons have different functionalities which can be applied to the page, however, in this case the widget icon is relevant in terms of publishing articles or resources which would populate the website and makes it a lot more user-friendly. |
Once you have selected the '''widget icon''' another screen will appear which is demonstrated in the screenshot on the left-hand side. Once you have set a title for your widget you then need to select the drop-down menu ‘'''Widget Name'''’ and select the category you will to portray visible on the website. You will see several check boxes below, in this case, being the article category you will see all the existing articles which then you can select to be visible on the site. You also have a choice to save it as a drat if you are busy or want to double check that all the content is right before it goes live on the site. | Once you have selected the '''widget icon''' another screen will appear which is demonstrated in the screenshot on the left-hand side. Once you have set a title for your widget you then need to select the drop-down menu ‘'''Widget Name'''’ and select the category you will to portray visible on the website. You will see several check boxes below, in this case, being the article category you will see all the existing articles which then you can select to be visible on the site. You also have a choice to save it as a drat if you are busy or want to double check that all the content is right before it goes live on the site. | ||
The draft mode is hidden on the site by the users only when you're in the edit mode then you can view the widget you wish to apply. You will see on the left-hand side screenshot of the steps to implement the article widget on to your site. | The draft mode is hidden on the site by the users only when you're in the edit mode then you can view the widget you wish to apply. You will see on the left-hand side screenshot of the steps to implement the article widget on to your site. | ||
| + | <br/> | ||
| + | <br/> | ||
| + | <br/> | ||
== Common Problems and Fixes == | == Common Problems and Fixes == | ||
Latest revision as of 13:25, 27 July 2018
The Articles section is the News / Articles / Blog / similar, section of the UnionCloud website. It is the simplest form of content on UnionCloud. This module has been developed to make it easy to create, edit and manage your articles, so that your news stories can be displayed to the users in an attractive manner.
Contents
Manage Articles
This is the summary page of your Articles within the Dashboard of your UnionCloud site, it shows you an overview of you're most recent articles (20) as the it is paginated, though if you want to show all there is a button to do that at the bottom.
As with most of the sections of the Dashboard, this view is set out in a very easy to read, and easy to understand manner.
The table shows you the Name, Date Created, Date Updated, Status, Category, and Number of views for each of your News Articles, you can also use the Filter![]() button in the top right to search for articles by Name, Category or Date Range. Clicking the Add Button at the bottom of the page, or the Edit
button in the top right to search for articles by Name, Category or Date Range. Clicking the Add Button at the bottom of the page, or the Edit![]() button, will take you to the Adding / Editing Articles screen, as outlined below, The Delete
button, will take you to the Adding / Editing Articles screen, as outlined below, The Delete![]() button, presents a pop up, asking if you are sure you want to delete the article, if you accept the article will be removed from your website (if you want a less permenant solution, you can move an article to drafts, again explained below), then small clock like button, shows when the article will be visible from, and until if you have chosen to set that.
button, presents a pop up, asking if you are sure you want to delete the article, if you accept the article will be removed from your website (if you want a less permenant solution, you can move an article to drafts, again explained below), then small clock like button, shows when the article will be visible from, and until if you have chosen to set that.
Adding / Editing Articles
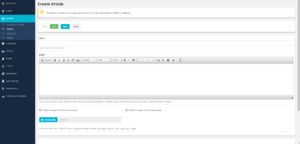
Every article has 2 Mandatory fields, Title and Body, if 'Display image in articles home page' is checked, 'Image' also becomes mandatory.
- Title - The Title of each article must be unique, and will serve as the 'Headline' for your story.
- Body - This is the content of your article, set as mandatory to prevent accidentally uploading blank stories.
[Checkbox]Display image on articles home page
Image - File Upload box
[Checkbox]Display image in article detail page - This is if you want the thumbnail for the article to also be shown when a user clicks to view the full article- Article Tags - Complete this, with words relevant to your article, this will help search engines index your results, including the search bar on your site!
- Start Date/Timing - Calendar & Clock to set when you would like the article to appear on your website, useful for embargoing content, or prepping stories in advance, they will remain unpublished until that time.
- End Date/Timing - Similar to above, but to take stories down at a certain Date/Time
[Checkbox]Include in RSS feed - If a user decides to use an RSS Feed to view your site news, this article will be withheld.[Checkbox]Show on articles index page - If this is checked, this article will appear in the Articles View Shown on the right.[Checkbox]Show on news/articles widgets - If this is checked the article will appear on the Widget as shown at the top.[Checkbox]Do not show this article on subsite article index page - If you are using Subsites, you can choose for them to only have relevant news shown, by keeping main site news out of the news section for subsites.[Checkbox]Do not show this article on subsite article widget - If you are using Subsites, you can choose for them to only have relevant news shown, by keeping main site news out of the news widget for subsites.[Checkbox]Save as Draft - If you check this box, when saved the article will save in a state where it is not visible on the website, and can't be found by visitors using search
View / Search Articles
You can find this page on your own site at url: <yoursite>/articles
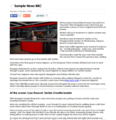
The two images to the right show examples of how Articles appear when viewed on the front end of the website, firstly at the Articles View, and secondly when you click to expand a particular article, for the full view.
Widget Options
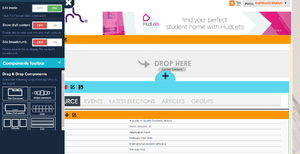
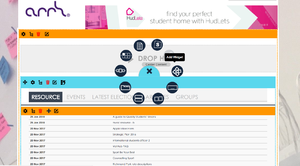
On the front end of the website, there will be a small settings cog on the left-hand side if you click this it will bring up some options that will allow you to turn on ‘Edit Mode’ this then allows you to implement elements you want to appear on your website.
The blue bar which is a tab container you will see a plus sign which appears in the middle. Once you click the plus sign you will be able to see different icons these icons have different functionalities which can be applied to the page, however, in this case the widget icon is relevant in terms of publishing articles or resources which would populate the website and makes it a lot more user-friendly.
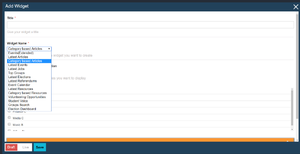
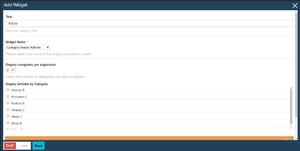
Once you have selected the widget icon another screen will appear which is demonstrated in the screenshot on the left-hand side. Once you have set a title for your widget you then need to select the drop-down menu ‘Widget Name’ and select the category you will to portray visible on the website. You will see several check boxes below, in this case, being the article category you will see all the existing articles which then you can select to be visible on the site. You also have a choice to save it as a drat if you are busy or want to double check that all the content is right before it goes live on the site.
The draft mode is hidden on the site by the users only when you're in the edit mode then you can view the widget you wish to apply. You will see on the left-hand side screenshot of the steps to implement the article widget on to your site.
