Manage Events
You can find this page on your own site at url: <yoursite>/administrator/events
This is the summary screen for managing all the events you've created, past and present.
In the usual format it is presented as a table which is separated into pages of 20 results, the first page you see is the 'Current' Events section, though there is a button just above the table to show all 'Past' events run by the Union also.
The table lists Events showing; Name, Event Type, Start Date/Timing, Publish Date/Timing with and option to Filter![]() results, with options available to View
results, with options available to View![]() , Edit
, Edit![]() , Cancel
, Cancel![]() , and Copy
, and Copy![]() existing Events.
existing Events.
View Event
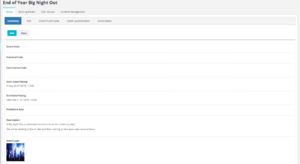
This shows you a summary of information about any particular event, all you have to do is click the View![]() button next to an events listing, in your Events screen.
button next to an events listing, in your Events screen.
It provides a summary containing;
- Event Code
- Nominal Code
- Cost Centre Code
- Start Date/Timing
- End Date/Timing
- Published Date
- Description
- Event Logo
- Event Capacity
- Venue
- Contact Details
- Website / URL
- Include in RSS Feed Y/N
See a detailed description of each field in the Create / Edit Event section at the bottom of this page.
Booking Details
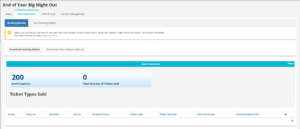
Selecting the Booking Details tab within an Event allows you to see an overview of all users who have booked tickets to this Event, with further details of; Name, Email id, Quantity, Status, Redeem Status, Ticket Type, Ticket Number, Date Purchased and Collected Date:Time.
Click on the 'Download booking details' button to download this information into a CSV file.
Click on the 'Download all participant photos' to download images of all the users who have booked tickets for your event.
Clicking on the blue band labelled 'Quick Summary' will dropdown to show you a basic overall summary of your ticket sales, including Event Capacity, Total Number of Tickets Sold and Ticket Types Sold.
New for September 2017-Queue-IT functionality
Bulk Booking Details
Next to Booking Details there is a 'Bulk Booking Details' tab in the ribbon. This shows an overview of all users who have booked bulk tickets for your event. In this section you can do all the same actions as in the Booking Details section, see above.
User Groups
Clicking on the User Group tab within an event will take you to the default List User Groups page. This pages lists all the groups involved in your event. When an event is created it is automatically set up with two default usergroups, Administrators (the users who are in charge of managing the event) and Participants (users who are attending / did attend the event). Clicking on [Show Count] will show the number of members in that group.
Click on the ![]() next to a usergroup to view three options, view, edit and upload members. Click on the
next to a usergroup to view three options, view, edit and upload members. Click on the ![]() icon to view a usergroup, here you will be able to add members to this usergroup. Click on the
icon to view a usergroup, here you will be able to add members to this usergroup. Click on the ![]() icon to change the description and permission set for this usergroup. For more details on these actions see User Groups & Permissions.
icon to change the description and permission set for this usergroup. For more details on these actions see User Groups & Permissions.
Send Message
Under User Groups select the Send Message tab to bring up the page to the right. This page allows you to send messages to the guests of your event. Use the tickboxes to select which usergroups you want to send the message to, add a subject line and the main content of your message into the Comment box, then press the Send button. Your message will then be sent to all the users in the groups you have choosen.
Content Management
This is where you can create a separate subsite for your event if you so wish, this process is the same as where creating and managing your website. See Developers Toolkit for more details.
Copy Event
This is a useful feature that was added with Release 23 simply click the Copy / Duplicate![]() button next to any event, it gives you the ability to copy events if you have a semi regular event taking place and also saves you the effort of recreating it from scratch. If you have a recurring event it gives you the ability to schedule the recurrence too.
button next to any event, it gives you the ability to copy events if you have a semi regular event taking place and also saves you the effort of recreating it from scratch. If you have a recurring event it gives you the ability to schedule the recurrence too.
Once clicked you will see a pop up for recurring events, it will Copy The name as it is, though this and other aspects can be changed for a handful of events at a later date for example if you were to host a weekly club night event, but wanted to make a one of themed night for Hallowe'en or such you could Rename / Edit an individual event.
- Frequency
- Daily
- Weekly
- Fornightly
- Monthly
- Other;
- Other allows users to set the event to recur every
Xnumber of days
- End After
- Specific number of occurrences
- Or by specific date
Remember, when duplicating events, it copies every aspect of the event, so if you are going to have tickets for the events make sure you have created these on the events you are about to copy as otherwise you will still have to manually create the tickets for each event!
Delete Event
Cancelling an event is as straightforward as it sounds, simply click on the Cancel![]() button to stop an event, remove it from the Events Index page on the front of your website, and email attendees letting them know. Once clicked you will be shown a pop up asking you to confirm you wish to cancel the event or not.
button to stop an event, remove it from the Events Index page on the front of your website, and email attendees letting them know. Once clicked you will be shown a pop up asking you to confirm you wish to cancel the event or not.
Add / Edit Event
Create Event / Edit Event
When you are creating a new event or editing one you have already created you will see a page with the following fields.
| Field | Description |
|---|---|
| Name* | RequiredStraightforward enough, the Name for your event. |
| Nominal Code | This Code is so that when the finance is transferred, twice monthly, staff can attribute the money you receive to the correct groups. |
| Event Type* | Required A series of tickboxes which you can select to place your event within a type, this helps by grouping events together on the Event Index, so users can see similar types of event together. |
| Start Date/Timing* | Required Calendar & Clock to set when you would like the event to begin. |
| End Date/Timing* | Required Calendar & Clock to set when you would like the event to end, after this date passes, the event will be removed from your events index page / widget. |
| Description* | Required Rich Content editor allowing style, editing of source code, and embedding of content, such as images and videos if you wish to do so. These will be used as ticket descriptions on the front end page that users see when selecting their ticket type. See screenshot. |
| Venue* | Required Open text, allowing you to list the venue of the event |
| Contact details:* | Required Open text allowing you to list a contact to reach for questions about the event |
| Event Capacity* | Required Total number of tickets that can be sold to this event if tickets are used (if tickets aren't used this box still needs completing, but it doesn't matter what number you enter. |
Advanced Options
Click on the orange band which displays Show Advanced Options to drop-down a list of additional options which you can apply to your event.
| Field | Description |
|---|---|
| Event Code | This can be in any format you would like it to be and can help you code your events at a later date. |
| Cost Centre Code | This can be in any format you would like it to be and can help you audit your events at a later date. |
| Published Date/Timing | Calendar & Clock to set when you would like the event to first appear on your website, useful for embargoing content, or prepping events in advance, they will remain unpublished until that time. |
| Add Logo | File Upload box |
| Website URL | Open text for further information about an event or a partner |
[Checkbox]Hide available ticket count |
Check this box if you don't want users to see how many tickets are available on the front end when buying tickets, see screenshot. |
[Checkbox]Only over 18's can attend |
Checking this box will perform a validation preventing anyone with a DoB, making them younger than 18, on the day the event takes place. |
[Checkbox]Check this to create bespoke sub site |
|
[Checkbox]Include in RSS feed |
|
| Event Tags | Enter tags here that are descriptive of your event, separated by a comma , they will be used to help locate your event when someone uses the search function.
|
[Checkbox]Event Terms & Conditions |
Enter custom terms and conditions for this event here. |
When you have finished click on the Save button at the top of the page to save your event.
Event Ticket Types
Now you have your event set up you will need to create Ticket Types so that users can actually book tickets for the event. To do this click on the Event Ticket Types tab on the ribbon. This page shows all the ticket types available for this event including the details: Ticket Name, Item Price, Transaction Fee, Maximum allowed to sell, Type and Available. On a ticket type on have the option to view ![]() , edit
, edit ![]() and delete
and delete ![]() .
.
Add / Edit Event Ticket Types
When you click Add Event Type Ticket or Edit ![]() you will be brought to a page with the following fields for you to fill in.
you will be brought to a page with the following fields for you to fill in.
| Field | Description |
|---|---|
| Ticket Name * | Required Enter a suitable name for this ticket type. |
[Checkbox]Bulk Tickets |
Check this box to allow user to bulk purchase this ticket. Note that bulk tickets can only be purchased via Remote Sales and its quantity reserved from the overall event capacity. |
| Availability* | Required Tick the boxes to show whether this ticket type is available for Sale via the website eshop (Online) or Remote Sales (Offline) or both of these. |
| Price | Enter the base price of the ticket. |
| Fee | Enter the transaction fee charged per ticket. |
| Nominal Code | Select the nominal code for this event ticket type. |
| Maximum number allowed to sell | Enter a number in here if the tickets need to be capped to a certain amount. |
| Ticket Description * | Required Enter a description for this ticket type. |
Advanced Options
Click on the orange band which displays Show Advanced Options to drop-down a list of additional options which you can apply to your ticket type.
| Field | Description |
|---|---|
| Cost Centre Code | This can be in any format you would like it to be and can help you audit your events at a later date. |
| Start Date Time | Select a start date and time for when you want this ticket type to be available for purchase. |
| End Date Time | Select an end date and time for when you want this ticket type to stop being available for purchase. |
| Maximum number of tickets a user can purchase | Enter a number to cap the number of tickets a user can purchase. |
| Usergroup | Here you can enter usergroups, anyone outside of those usergroups will not be able to see this ticket type for purchase. |
| Mandatory related membership type | Any memberships you enter here will restrict only those who have already purchased this membership to be able to purchase this ticket type. |
[Checkbox]Guest Pass |
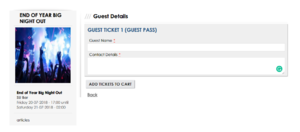
Check this to mark this as a guest ticket type. Note that this can only be done if at least one regular ticket has been setup prior for this event. When a guest ticket is purchased it will prompt the purchaser to input extra details for the guest, see image below. |
[Checkbox]VAT Exempt |
If you're unsure about this please check with whoever manages the finance for your Union. |
[Checkbox]Stop ticket sales |
Check this to stop sales for this ticket type at any point in the sale period. |
When you have finished click on the Save button at the top of the page to save your ticket type.
Event Questionnaire
This is where you can add questions which will be asked of users when they purchase a ticket for your event. For example you would need to ask for dietary requirements if you were hosting an event which provides food.
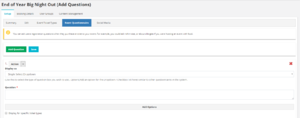
Click the Add Question button to add a new question. The Action drop-down allows you to tick a box if the question is required. The Display as field allows you to select how the question can be answered, there are four options; Single Select Dropdown, Multi-Select Tickbox, Text Box and Check Box. Question is where you will input the actual question you want answering, this is a required field. Tick the box Display for specific ticket types to select which ticket types this question is applicable for if you have more than one type. Remember to click Save when you are finished.
Click the red X in the top right-hand corner to remove the question and Add Question to add another.
Social Media
This is where you can link your social media accounts to your event so that you can automatically share updates. There are two options, Facebook and Twitter. Select the radio dial next to the social media provider you wish to use and login to your account.


