Images Library
When you first load the image Editor, by default it takes you to the 'List View' that is because this is the original view that was built into Union Cloud, the 'Tree View' was added at a later stage, they are both easy to use and understand. Though the tree view helps you to better organise your images into folders.
Accepted File types .JPEG .JPG .PJPEG .PNG .X-PNG .GIF .BMP
Contents
Tree View
You can find this page on your own site at url: <yoursite>LINK NEEDS UPDATING
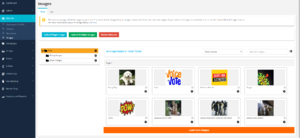
The Tree View for Image Library is the newer of the two Image Library views, this is much more powerful than just the List view, detailed below, starting on the left you can see the Tree structure that the folders are organised into, it is even possible to nest folders, and have sub folders, as you can see in the screenshot. To add a new folder, simply hover over a cog, and click the folder button with a plus icon over it.
You are able to drag and drop multiple images into folders too, simply check the boxes, in the top left hand corners for the images, once a number are selected you should then be able to drag and drop a number of images into the folder of your choosing.
In the main window there are a number of ways to sort the images for the current folder [Most Recent - Least Recent], [A - Z], and [Z - A] by file name. You can also use the search box in the top right to filter images by file name.
Continue
List View
You can find this page on your own site at url: <yoursite>LINK NEEDS UPDATING
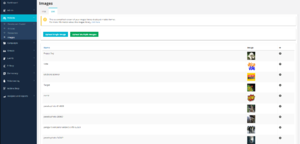
This view will be most familiar to you, as it matches many of the other View / Manage / Overview style pages throughout the site, its table like in nature, showing you the 'Name' and a thumbnail 'Image' for any particular record, along with in the third column, the View![]() , Edit
, Edit![]() , and Delete
, and Delete![]() buttons, along with the option to filter your results by searching for a name, using the Filter
buttons, along with the option to filter your results by searching for a name, using the Filter![]() button on the top right.
button on the top right.
Image Uploads=
As for uploading images, there are a number of ways this can be done, 'Single Image Upload', and 'Multiple Image Upload' which are accessed by their two buttons at the bottom of either the Tree, or the List style Image Library pages. Or there is the CK Editor Image Upload, accessed by clicking the Image button on the menu bar of the Text Editor anywhere it appears on the website.
Single Image Upload
You can find this page on your own site at url: <yoursite>LINK NEEDS UPDATING
A simple image upload too, that allows you to upload, individual images, all you have to do is enter a Name for the image, which helps when you're trying to search for images in the library, so try to make it something sensible, try using naming conventions too! Then click the choose file button, and browse for the file on your computer, similar to the 'Tree View' Image Library, the tree structure is there on the left hand side, if you select the folder you want to drop the images into before you process the upload, it will save you having to move them afterwards. Finally click save and that's it done, it will take you to a summary page for the image you've just uploaded.
Multiple Image Uploads
You can find this page on your own site at url: <yoursite>LINK NEEDS UPDATING
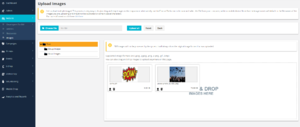
The more advanced image upload too, this one allows you to upload, up to ten images at a time, by simply dragging and dropping them from your desktop into the dotted area as indicated, unlike single upload where you are required to give an image a name, this takes the image name, from the file name, you will also notice, that similar to the 'Tree View' Image Library, the tree structure is there on the left hand side, if you select the folder you want to drop the images into before you process the upload, it will save you having to move them afterwards.
Multiple image upload also doesn't require using drag and drop upload (though it is easier), if you need to search for your images, you can simply still click the 'Choose Files' button.
Once done simply click 'Upload All' to upload the images 'Reset' will forget the images you've dragged in so far, and 'Back' will take you back to the Library.
Any time you use the multiple images uploader, and you haven't remembered to select a folder before you press Upload, the images will be placed in the Root folder, and they can always be sorted at a later date.
CK Editor Image Upload
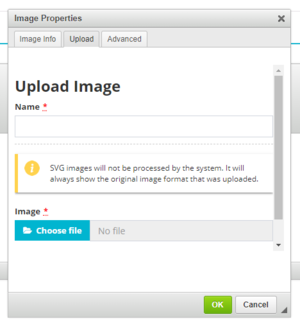
This Image Upload tool is one of the more commonly used, it is the easiest way to upload an image to an Article / Event / Webpage without leaving the editor if you have forgotten to upload the image in advance, simply click the image button on the menu Bar of the CK Editor, and an 'Image Properties' window will pop up, choose the Upload tab, along the top, and follow the instructions. Give the image a Name, and then Select the file from your computer and press, upload, after which if you return to the Image Info tab, when you click the browse server button, it will load something similar to the Image Library Tree View, to select the image to include in your currend page.
This is also one of the more messy options for completing an image upload as it doesn't allow you to store the image in a particular folder, for keeping you image library organised.


