Difference between revisions of "How to set up an election"
(→Add Standings Section) |
(→Add Standings Section) |
||
| Line 245: | Line 245: | ||
! State !! Icon !! Description | ! State !! Icon !! Description | ||
|- | |- | ||
| − | | Open || {{open}} || | + | | Open || {{open}} || Nominations for this standing are currently open, they will close at the date/time indicated |
|- | |- | ||
| − | | Closed || {{closed}} || | + | | Closed || {{closed}} || Nominations for this standing have closed. |
|- | |- | ||
| − | | Pending || {{pending}} || | + | | Pending || {{pending}} || Nominations times for this standing have been set, they will open on the date/time indicated |
|- | |- | ||
| − | | No Self Nomination || {{no-self-nomination}} || | + | | No Self Nomination || {{no-self-nomination}} || Self nomination has not been set for this standing. |
|} | |} | ||
Revision as of 09:32, 10 May 2017
The Elections System in UnionCloud is constantly growing and improving, it's had numerous updates over the past few years, from the introduction of Self Nominations, the addition of a Live Election stats area, and more recently some small improvements to the User Experience when using Self Nomination, and Voting, which you can read more about in the Version History section.
Contents
- 1 Login & Access Dashboard
- 2 Voting UserGroups / Data
- 3 Navigate to the Elections Module
- 4 Understanding our Elections Hierarchy
- 5 Manage Categories
- 6 Manage Positions
- 7 Manage Elections
- 8 Add Standings Section
- 9 Manage Candidates
- 10 Manage Nominations
- 11 Add Standings Section
- 12 FastTrack Functionality
Login & Access Dashboard
Access Dashboard
- Hover over Username
- Select Your Dashboard
- If this option isn't available you don't have administrative permissions.
If this is the case, in the first instance contact your Lead Union Cloud administrator, and ask them to update your permissions, if this doesn't work, or they are unsure how, then contact ZenDesk.
- If this option isn't available you don't have administrative permissions.
Voting UserGroups / Data
You have two options for UserGroup data within Union Cloud, you can use the default usergroups, or create some of your own.
![]() Note: It's worth remembering that you aren't just limited to one usergroup, you aren't setting the usergroup up for the whole election, you can set up usergroups to apply to specific positions within an election, for example, you could use the 'Confirmed Students' usergroup for your SU President, and then create a Custom Usergroup called 'Self-Define Women 2018' to use for electing a Women's Officer
Note: It's worth remembering that you aren't just limited to one usergroup, you aren't setting the usergroup up for the whole election, you can set up usergroups to apply to specific positions within an election, for example, you could use the 'Confirmed Students' usergroup for your SU President, and then create a Custom Usergroup called 'Self-Define Women 2018' to use for electing a Women's Officer
View Confirmed Students

In most cases we expect UnionCloud users will be using their 'Confirmed Students' usergroup, this is the Group that gets populated with students whenever the institution provide you with a CSV of Data, and you upload it, or alternatively if you're lucky enough when your institution automatically transfers the data to you. To check if you think this usergroup is correct, we recommend you navigate to;
You can find this page on your own site at url: <yoursite>/administrator/user_groups
Once at this page, if you click [Show Count] button next to any of the usergroups it will reveal the current number of users. Remember if you've just uploaded a file and you're wondering why this hasn't increased, these files are processed overnight, so the numbers won't update until the following day.
Add to Confirmed Students

If this number seems too low to you, it may be that your data is out of date, and some students have left, or there were errors in your previous upload or any number of reasons! Either way, it's time to fix the problem! Using the Navigation you should move to the upload files section Dashboard >> Admin >> File Uploads >> Student Upload
You can find this page on your own site at url: <yoursite>/administrator/upload_files/upload_student_file
Once in this section, you can use it to upload a file of Student Data to the 'Confirmed Students' usergroup, it's worth noting that this file can also be used to UPDATE, and DELETE students from your Confirmed Students Usergroup, for more information about what to put in this file, see the Upload Files Section
![]() Note: If you think there are too many students in this file, contact ZenDesk support!
Note: If you think there are too many students in this file, contact ZenDesk support!
Use a Custom UserGroup
Alternatively it might be the case that the usergroup you want to use for your elections isn't the confirmed students user group, there are numerous examples of why this might be the case, it could be that you have officers for specific campuses and you are creating usergroups for individual campuses, alternatively you might have a usergroup of students who self define as women, whom you want to use for a Womens' Officer election, whatever it is, this is the process to follow, navigate to;
You can find this page on your own site at url: <yoursite>/administrator/user_groups/custom_tree
Once here, you either create the new UserGroup, or expand the folder structure to find the usergroup you want to use. In this example we're going to create a brand new group, but if you were to reuse one, you can just move ahead to where we talk about adding users to the group.
- Select the 'Add User Group' button as highlighted in the screenshots below
- Complete the Name & Description Fields, the Permissions field should be left blank unless you want to assign this group permissions for something on your site.
Click button highlighted in Red Box to Create New Custom User Group.
Complete the Fields and click save.


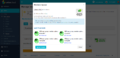
Add users to Custom UserGroup
Once you have downloaded the template following the above instructions you should complete is as per the information on the pop up.
If the users you are uploading are already account holders on your UnionCloud site, you only need to include an email address for that user, and what date you want them to expire from this usergroup. Otherwise you will need to provide some more details. You should also remember that if they aren't already in you UnionCloud site and you are uploading them using this method, to complete all the data, and also check the Add users for e-voting checkbox.
Getting the CSV Template
Select Upload Members to access the Template, and upload box.
Click the highlighted button to download a CSV Template to upload.


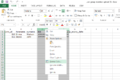
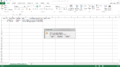
Something to be careful of! Some versions of excel alter the data format, so before you upload this document, please do the following, select the data in both of the date columns, 'dob' and 'membership_expiry_date', columns D and F, right click on one of the columns, then choose 'Format Cells', on the formatting window choose date, and then make sure you select the 3rd option down as the date needs to be in the format DD/MM/YYYY. Then click okay.
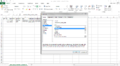
Next select the close button in the top right hand corner of the screen, choose Save when asked 'Want to save your changes to <document name.csv>' in the following box ensure that the 'Save as type' field says CSV (Comma delimited) as in the screenshot, then save the document somewhere convenient, with a sensible file name.
You will be presented with one final dialogue message, it is notifying you that not all Excel features are available in CSV files, and if saved in the current format you could lose some, this however doesn't affect you, so simply click Yes, and the document will close, saved in the location you selected.
Adding the data to the CSV
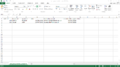
This is the User Group Member Upload CSV.
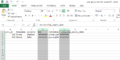
Highlight the Date Columns, dob, and membership_expiry_date.
Choose Format Cells.
Select Date Format, and Choose the third option.
Ensure Save as Type is CSV(Comma delimited).
Select Save.

Ignore the warning and save as CSV File Type.


Once you have saved the data, you should return to the same page in UnionCloud, and on the same Dialogue that you clicked earlier
Uploading the CSV to your UnionCloud site.
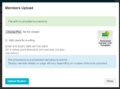
Pull up the Member Upload dialogue again.
This time use the dialogue to upload the file, instead of downloading the template
File uploaded successfully.


Doing your Check-Back
The data isn't ready yet, you need to do at least one check back the following day!
Because of the number of Unions on board, it wouldn't be feasible to process these files immediately, as such the data CSV's that you upload are processed overnight.
The following day if you check-back in this section you may see an error report, you should download this file, and check for issues with any of the users and try to reupload them, remember, if you haven't successfully got a user into one of the User Groups you intend to use, they won't be able to vote in that particular standing!
Take note of where you will find your error report, as it differs depending on if you uploaded the users to your site, or if you uploaded them directly to a user group.
If you were using the Admin >> File Uploads section, you will find the error files here.
If you were uploading students directly to a usergroup, you will find the error files here.


Access the Elections Module
- Hover down the Left Hand Navigation to the section called Democracy>, and click to expand it.
- From the sub-menu move to E-Voting>, and expand that section.
-
- If these options aren't available to you, you haven't been assigned Manage eVoting permissions.
If this is the case, in the first instance contact your Union Cloud administrator, and ask them to update your permissions, if this doesn't work, or they are unsure how, then contact ZenDesk.
- If these options aren't available to you, you haven't been assigned Manage eVoting permissions.
-
Understanding our Elections Hierarchy
If you have set up elections before, and already have your Categories & Positions set up, please feel free to skip onto the Manage Elections Section.
If you haven't set up Categories or Permissions before, or you need to create some more, these next steps will talk you through the process.
The crucial thing to understand, is that it is important not to run several different 'elections' at once, you should run only one election, that has multiple categories, and then each category have within it, multiple positions.
You can picture it working something like this;

Manage Categories


You can find this page on your own site at url: <yoursite>/administrator/evoting/evoting_categories
You create a category for each different type/ group of positions you wish to hold an election for, you may wish to group your elections in a number of different ways, for example you could create a category for;
- Full Time / Executive Officers
- Part Time/Representation Officers
- NUS Delegation Elections
- Sports elections
- Society Elections
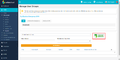
You could even, potentially, create a new category for every different club / society. The only difference here, is how they are grouped when shown on the End User Elections screen, which you can see examples of in the screenshot on the right.
You can see the Election in question 'Example Multiple Category Election' contains three different Categories, Executive Officers, PTO's, and Sports Club Elections, and within each of these, a number of positions, please note the stats counter on the right it counting stats based on a number of other test elections which were running, not just what you can currently see in the screenshot.
The Category Description field that you need to fill out, this text appears under the orange heading you can see in the screenshot on the right, you can populate this with information so your voters have any information they need about votes on elections within a particular category.
![]() Note: We advise that when creating Categories, you don't label these by year, for example instead of 'OfficerElection 2018' you should call a category 'Student Officers' and then name the Election 'Officer Elections 2018' instead. The reason for this is that once You assign a Position to a Category, and it is used in an election, it's then 'locked' to that category, and if you created a new Category for 'OfficerElection 2019' instead of being able to move the position, you would need to create a new one.
Note: We advise that when creating Categories, you don't label these by year, for example instead of 'OfficerElection 2018' you should call a category 'Student Officers' and then name the Election 'Officer Elections 2018' instead. The reason for this is that once You assign a Position to a Category, and it is used in an election, it's then 'locked' to that category, and if you created a new Category for 'OfficerElection 2019' instead of being able to move the position, you would need to create a new one.
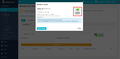
Add a New Category

You can add a new category relatively easily, choose the 'Add Category' button to the top left of the grid. This will open a separate screen with two boxes to complete,
- The Title of the Category
- For example Exec Elections, Club Elections, Society Elections etc.
- The Description of the Category
- Try to make this fairly descriptive to stop anyone accidentally putting positions into the wrong category at a later point in time. This is particularly a problem if you have a number of different staff processing elections! Be as clear as possible.
Manage Positions

You can find this page on your own site at url: <yoursite>/administrator/evoting/evoting_positions
Each position is an individual elected role, now that doesn't necessarily mean it can only be one person.
You can set the number of seats for a position when you are setting up an election, but for example you need to set up a unique position for each one you wish to run.
Therefore, you can't just set up a 'President' position, and use it for all of your Clubs / Society elections. You would need to set up a 'President', that is a part of the 'Executive' Category, and a Chess President, that is part of the Society Elections Category, or a part of a 'Chess Elections' Category if you set it up to be that granular. You will need to create the roles for each group. Though this only needs to be done once.
Add a New Position

You can add a New Position, from the Manage Positions screen, choose the 'Add Position' button to the top left of the grid. This will open a separate screen with two boxes to complete,. from there you just need to complete the dialogue options on screen.
Again, as with the Add Category information above, it's an exercise in completing the fields on screen.
- Title - The Name of the position, as it will appear on the eVoting page
- Elections Category - Select the Category you want this election to appear in.
- Description - When a user is browsing through the elections, they will see any relevant information you provide here about the position they are going to vote in.
CheckboxMap to group committee - You if you tick this box, the next two fields will become visible allowing you to link a position to a committee role in a Group (Club / Society).
The Description of the Position goes here, if it's for a Full Time Officer, you may want to include some information such as the job role, or dutues, perhaps the job description if you have one, if it's for a Club/Society Committee member you may want it to include information like the dutues they are expected to carry out within their student group.
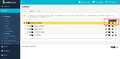
Manage Elections

You can find this page on your own site at url: <yoursite>/administrator/evoting/evoting_elections
This screen gives an overview of ALL elections what state they are currently in, and when they should open and close. For every election, the state column will contain an icon which should give you an idea of where your election is right now. The table below explains each of those states.
| Category | Icon | Description |
|---|---|---|
| Open | |
This election is currently open for users to vote in. |
| Pending | |
The setup for this election is complete and it will go live at the time indicated. |
| Draft | |
This election is either marked as draft, or setup is incomplete, this will not go live. |
| Copied | |
This is a copy of an election, used when candidates need to be disqualified at the close of voting, or for gender balanced elections. |
| Closed | |
This election has ended. |
| Cancelled | |
This election was cancelled before it reached completion. |
Select the Add Election button, to the top left of the table to begin creating a New Election.
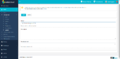
Creating a New Election


Follow the boxes on screen to Setup your Election, mandatory fields are marked with a red asterisk(*)
| Field | Type/Description |
|---|---|
| Name* | Required Open Text - Use this field to give your election a sensible name, We would suggest Type of Election / Time / Year "Officer Elections March 2018" for example. |
| Running From* | RequiredDate/Time Picker - This box is the start time of your election not your nominations, ensure you put the time you want voting to begin in this box.
|
| Running To* | RequiredDate/Time Picker - As above, this box is related to your election, whatever you put in this box is the time voting will end.
|
| Daily polls open | Time Picker - Use the date time picker to set what time of day you want your polls to open during the election. This should be left blank if you want 24 hour polling. Further Explanation below.
|
| Daily polls close | Time Picker - Use the date time picker to set what time of day you want your polls to close during the election. This should be left blank if you want 24 hour polling. Further Explanation below.
|
| Additional Information for Self Nomination | This is information that a prospective candidate will see on the Self-Nomination screen, you can see an example in the screenshot to the right. Further Explanation below. |
| Select this to add RON as default candidate in this election | [Checkbox] - Selecting this box will automatically add RON to all of your Elections, if you don't you will manually have to add RON as a candidate in elections you wish to use it.
|
| Select this to show only eligible elections | [Checkbox] - If checked when a user comes to the voting screen, instead of seeing all elections and positions currently running, a user will only see elections they are eligible to vote in, useful if you are running lots of Course Rep / Club / Society elections at the same time.
|
| Select this to allow spoil ballot option during evoting | [Checkbox] - Selecting this option will give user a Spoil Ballot button, which will allow users to provide a short statement about why they are spoiling their ballot.
|
| Select this to allow user to modify the vote | [Checkbox] - Selecting this option will allow users to modify their vote after initially casting it.
|
| Send fast-track voting link to authorised students | [Checkbox] - If you want to use fast-track voting emails at all during the election you absolutely have to select this checkbox, if you don't you will be unable to send them out. More details on Fast Track emails later in this guide.
|
![]() Note: It is possible to extend an election by moving the 'Running to' time further into the future once an election has started, however it is not possible to reduce the amount of time in an election, or stop an election early. Ensure you get these details correct!
Note: It is possible to extend an election by moving the 'Running to' time further into the future once an election has started, however it is not possible to reduce the amount of time in an election, or stop an election early. Ensure you get these details correct!
Daily Polls open / close
This feature warrants a little further explanation, some unions choose to open and close their election polls outside of traditional 'waking' hours. So for example, open your polls at 07:00 AM, and then close them again at around 10:00 PM, which encourages candidates to limit the campaigning they do outside of these hours.
One of the major reasons for this is to do with candidate welfare, it stops candidates from feeling like they need to stay up for 7 days straight, and skip sleep just to get votes in the election.
This feature isn't mandatory, but if you wish you can open and close these polls at times of day as you wish.
Additional Information for Self Nomination
This section adds an additional box of information on the screen where a potential candidate nominates themselves. Once they click submit they are presented with the form to stand, before reaching the boxes they see the Role Description, and this box for additional information.
It isn't a requirement to use this box, however you can use it to provide additional information to candidates.
Our recommendation would be to use this to provide information about the election, election rules, candidates handbooks, example manifestos, info about word limits, campaign budgets etc. Perhaps even embed a video explaining how Transferable Vote works for example.
One important thing to note is that if you use this box, it applies the same message in this box for all positions within the election, so we advise that you put generic information in this field. However, you can UPDATE this info, for a specific position when it comes to using the Edit Standings screen.
Add Categories

Use this screen to select the categories you wish to include within your election.
Remember we advise that you include multiple categories within a single election, so for example we encourage you to run Officer Elections, alongside, Clubs / Society / Course Rep Elections, all of this serves to increase your overall turnout.
We have loads of examples of where SU's have run Club / Society elections at the same time, users voting for their group committee participate in voting in overall SU democracy, because they are already there. If you want some more information from us about this feel free to get in touch!
![]() Note: Before you leave this page you will get a warning! This is to double check you've only Added/Removed categories that you intended to. Remember you can come back to this page at any point before the election goes live to remove categories from the election if you no longer wish to run them. But remember if you remove a category, that has positions in it, and already had candidates, and then you press okay on the warning box, this data is lost.
Note: Before you leave this page you will get a warning! This is to double check you've only Added/Removed categories that you intended to. Remember you can come back to this page at any point before the election goes live to remove categories from the election if you no longer wish to run them. But remember if you remove a category, that has positions in it, and already had candidates, and then you press okay on the warning box, this data is lost.
Add Positions

Use this screen to select the positions you wish to include within your election.
Only select the positions you wish to include, as any positions that don't have standing candidates at when your election is due to go live may prevent it form doing so!
![]() Note: Before you leave this page you will get a warning! This is to double check you've only Added/Removed positions that you intended to. Remember you can come back to this page at any point before the election goes live to remove positions from the election if you no longer wish to run them. But remember if you remove a position, the details of any candidates have stood or submitted nominations will be lost, and they will need to be added / submitted again if you need to restore it, this data is lost.
Note: Before you leave this page you will get a warning! This is to double check you've only Added/Removed positions that you intended to. Remember you can come back to this page at any point before the election goes live to remove positions from the election if you no longer wish to run them. But remember if you remove a position, the details of any candidates have stood or submitted nominations will be lost, and they will need to be added / submitted again if you need to restore it, this data is lost.
Add Standings Section

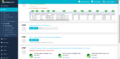
This screen gives an overview of ALL the standings within your election what state they are currently in plus the state of their self-nominations, if they are using it, along with when they open and close. For every position, the state column will contain an icon either Pending or Completed, it's worth noting that every standing in your election needs to be completed, before your election will go live, if you have standings which don't have candidates, make sure you remove them! Otherwise you will find your election doesn't go live.
| State | Icon | Description |
|---|---|---|
| Completed | |
This standing is completed, providing all others are, your election will go live. |
| Pending | |
There are one or more steps required to complete this standing, edit the standing for more information. Remember, election will not go live until all standings are completed |
Also from this screen you can monitor the state of any Self Nominations you have enabled, and also the open/close dates for these nominations. Self nominations aren't require for your standings to be 'complete' they are an optional extra for you to use, as a way of adding candidates.
So long as the 'State' of the standing is complete, the elections will go live as planned..
.
This table contains all of the possible Nomination Status'
| State | Icon | Description |
|---|---|---|
| Open | |
Nominations for this standing are currently open, they will close at the date/time indicated |
| Closed | |
Nominations for this standing have closed. |
| Pending | |
Nominations times for this standing have been set, they will open on the date/time indicated |
| No Self Nomination | |
Self nomination has not been set for this standing. |